- Published on
Monetizing Discord by creating a Stripe Discord Bot
- Authors
- Name
- Sedky Haider


So you have a Discord community which you wish to monetize. How?
Well, using Discord's SDK for development, Discordjs, and combining it with a payment processor like Stripe.
Here's the repo we use for the article.
How does it work?

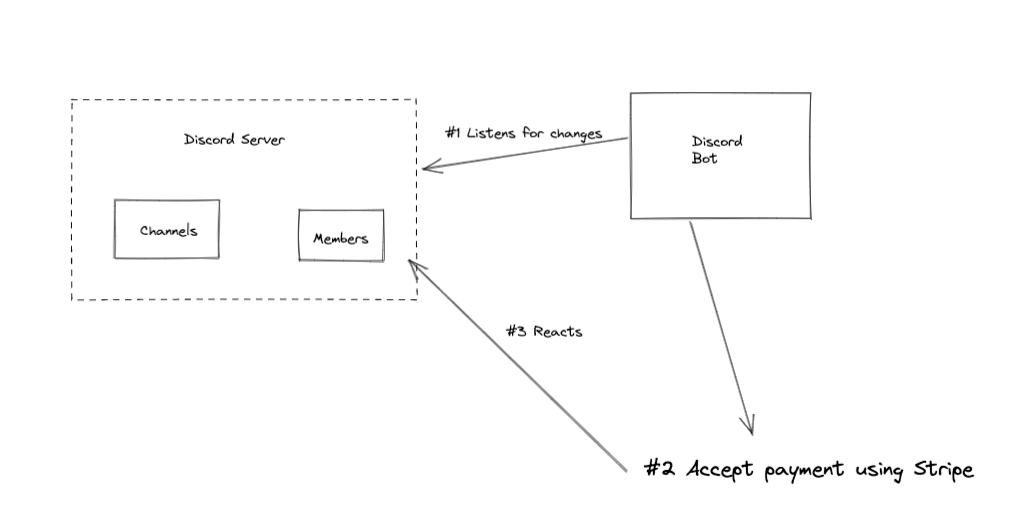
#1 - Bot watches Discord server
We run a Discord JS bot that watches our Discord server:
const initClient = () => {
    client.login(process.env.DISCORD_TOKEN);
    client.once('ready', async() => {

        guild = await client.guilds.cache.get(serverID)

        role = guild.roles.cache.find(role => role.name === "Premium");

        // Setup broadcast and listen channels
        trade_channel = client.channels.cache.get(channels.PREMIUM_ALERTS)
        if (trade_channel == undefined) {
            console.error("The trade channel isn't found!")
            return
        }
        commands_channel = client.channels.cache.get(channels.COMMANDS)
        if (commands_channel == undefined) {
            console.error("The input channel isn't found!")
            return
        }

        community_chats = client.channels.cache.get(channels.COMMUNITY_CHAT)
        if (community_chats == undefined) {
            console.error("The community chat channel isn't found!")
            return
        }
      ...
https://github.com/sedkodes/stripe-discord-subscriptions-bot/blob/master/discordClient.js#L21
The bot can look for specific activites such as:
- Look for replies to a certain channel
- Look for specific commands:
!subscribe - Look for emoji additions to a server

We can then set up our business logic to have it react based on the action.
For example, when somebody joins a new channel:
// When somebody joins, we send them a welcome
// message and give them instructions on how
// To agree to the disclaimer and sign up, etc.
client.on('guildMemberAdd', async function (member) {
  const welcomeMessage = `
Welcome ${member} to iStockSignals Alerts!
After you read and accept the message in <#874750795835383849>, our free community section will open up to you!  If you are looking for Live alerts, you can find that in our Premium Section.
If you need any help, please head over to our <#872910943422644244> section.
To get these premium alerts sent right to you on Discord, go to <#871423199408193576> channel. or you can go to https://istocksignals.com/ signing up through our website is quick, simple, and will automatically assign the roles inside discord for you!
Happy hunting.
    `

  member.send(welcomeMessage).catch(console.error)
})
https://github.com/sedkodes/stripe-discord-subscriptions-bot/blob/master/discordClient.js#L184
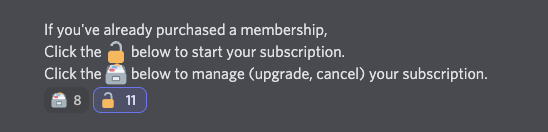
Or if a user adds a specific emoji type:
if (messageReaction.emoji.name === '🗃️') {
  let session
  try {
    //Create a customer portal and redirect them to it
    session = await stripe.billingPortal.sessions.create({
      customer: paidUser.stripe_customer_id,
      return_url: 'https://istocksignals.com',
    })
  } catch (error) {
    console.log(error)
    user.send('Error creating your Dashboard.  Please contact an admin.').catch(console.error)
    return
  }

  user.send('Your subscription portal: ' + session.url).catch(console.error)

  // Add Premium role to user
} else if (messageReaction.emoji.name === '🔓') {
  user.send('Your subscription is now activated.').catch(console.error)
  await addRole(user.id, config.discord.premiumRoleId)
} else {
  return
}
https://github.com/sedkodes/stripe-discord-subscriptions-bot/blob/master/discordClient.js#L155
#2 - Accept payments using Stripe
When the user performs the action we setup, our discord bot will react by generating a Stripe checkout page to the user:
router.route('/create-checkout-session/:plan').get(async (req, res) => {
  logToAdmin('New Checkout Session created!')
  // Create monthly or yearly plan
  const plan = req.params.plan === 'monthly' ? config.stripe.monthlyPlan : config.stripe.yearlyPlan

  // Create Checkout So they can Pay
  const session = await stripe.checkout.sessions.create({
    allow_promotion_codes: true,
    subscription_data: {
      trial_period_days: 7,
    },
    payment_method_types: ['card'],
    line_items: [
      {
        price: plan,
        quantity: 1,
      },
    ],
    mode: 'subscription',
    success_url: config.discord.inviteLink,
    cancel_url: config.homepageUrl,
  })

  // Take them to Checkout
  res.redirect(303, session.url)
})
#3 - Reacts.
Once a user pays, a Stripe webhook will notify our Discord bot, which reacts, by adding a role to grant the paying user elevated permissions.
The webhook can even notify admins in a private channel that there's a new subscriber:
router.route('/webhook').post(async (req, res) => {
  const webhookMessage =
    '💸💸 New Stripe event: ' + req.body.type + ' for: ' + req.body.data.object.customer
  logToAdmin(webhookMessage)

  switch (req.body.type) {
    // Remove role from discord
    case 'invoice.payment_failed':
    case 'customer.subscription.deleted': {
      const stripe_customer_id = req.body.data.object.customer

      // We already have customer email and Stripe customer ID saved from their purchase
      // Can simply use the Stripe customer ID for lookup
      const foundUser = await License.findOneAndUpdate({ stripe_customer_id }, { is_active: false })

      if (foundUser) removeRole(foundUser.discordID)

      break
    }
    // Save permissions to account
    case 'checkout.session.completed': {
      // Lookup the user via EMAIL if they're already registered
      // And linked with their Discord profile
      // Otherwise, create a new entry and save the stripe customer ID
      const email = req.body.data.object.customer_details.email
      const stripe_customer_id = req.body.data.object.customer

      await License.findOneAndUpdate(
        { email },
        { stripe_customer_id, is_active: true, email },
        { new: true, upsert: true, timestamps: true }
      )

      break
    }
  }

  res.json({ received: true })
})
Want to get started quickly? Use this get started repo.